Installation instructions for glue joint products

Tips for successful wooden floor installation and maintenance
Read the manual:
LOAD (in English) / LADDA (på svenska) / HERUNTERLADEN (auf Deutsch) and read the Timberwise installation guide carefully before actual installation. NOTE! The instructions for the traditional glued tongue and groove comes after the locking system instructions.
Before the installation
Please read this instruction carefully before installing the parquet. The Timberwise liability for defects does not apply to products that have been installed or maintained against the instructions. Order installation instructions for design parquet info@timberwise.fi. Note! 270 mm wide board should only be installed by gluing down to subfloor.
Download the glue-down to subfloor installation instructions here.
General information on the Timberwise parquet floor
Your Timberwise floor is a completely natural product. Modern production technology, critical grading and quality control do not remove the natural properties of the wood. Wood is hygroscopic, i.e. a ‘living’ material, so it absorbs and loses moisture according to the humidity and temperature of the air. Thus the volume of wood increases when it absorbs moisture and decreases when it loses moisture. When the wood floor is installed as a floating structure, it is important to leave expansion joints (approx. 10 mm) between the installed floor and solid structures so that it can expand and shrink according to fluctuations in air humidity and temperature. If the wood floor does not have space for so-called natural expansion, tensions may form as a result and damage the floor. In order to avoid damages, it is very important that the relative humidity is 35–60% (RH) and the temperature is between +18–24°C both during and after installation. Note! 270 mm wide board, should always be glued to the subfloor.
Quality inspection and liability for defects
Quality inspection and final acceptance before installation are the owner’s and installer’s joint responsibility, even if the owner was not present during installation. The installer must follow an acceptable situation assessment both before and during installation. Each floorboard installed on the floor is considered as approved by the installer and/or the owner. The owner is responsible for checking the subfloor for possible moisture and level deviations and the owner must also ensure that all requirements concerning installation conditions stated in the installation instructions are met as defined in the specifications before the installation of the floor. Liability for defects covers only the Timberwise floorings that have been installed and maintained according to the instructions.
Timing and planning of installation
Wood flooring should be installed after all other construction work is completed. Due to dark yellowing, the floor must not be covered for more than 1 week. In addition, you must ensure that damp materials (such as filler material) have dried sufficiently and that the conditions in the room are optimal for installing the parquet. Note! The parquet can only be covered max. 1 week, due to possibility of dark yellowing. A longer time period may expose the parquet to possible color changes, especially in lighter colors.
Wood flooring expands and shrinks less lengthwise than widthwise, thus we recommend installing the floor parallel to the longest wall in the room. In narrow spaces and corridors, when the installation must be completed crossways, an expansion joint of at least 10 mm must be left every 6 meters, so that the floor can expand and shrink widthwise. At the same time, it must be ensured that at least every third row of floorboards is laid using extended boards. In other cases, it is recommended to lay the parquet in the line of light. If the subfloor is an old board floor, the parquet boards are to be installed crosswise to it. When installing flooring equipped with the WiseLoc lock system, it is easiest to start near the wall that has the most doorways in the room. If there are doors on either end of the room, start the installation near one of those walls.
Expansion joints
To account for the expansion or shrinkage of the flooring with respect to fluctuations in air humidity, the parquet must be separated from the solid parts of the building by an expansion joint of approx. 10 mm in width. Solid structures include, among others, the surrounding and penetrating walls as well as the heating ducts. An expansion joint should also be left around other obstacles, such as pillars, stairs, kitchen islands, fireplaces, tile floors and thresholds as well as under doorframes. For large continuous floor areas (over 10 m long or over 6 m wide), the expansion joints must be larger than mentioned above. In a room of over 6 meters in width, the expansion joint must be increased by 1.5 mm per each meter exceeding 6 m. Expansion joints are covered using appropriate skirting boards. NOTE! Skirting boards should always be chosen based on the width of the expansion joint – not the other way around. In addition, the following points concerning expansion joints must be taken into account during installation:
- The stairs must be installed on the sub-floor so that the parquet flooring will have 10 mm allowance for moving from the mounting points. Load-bearing structures of stairs (e.g. stringers or handrail supports) must never be mounted directly on the parquet!
- Fixtures or load-bearing structures such as partitions, must never be installed on the parquet floor! They lock the floor so that the floor cannot expand or shrink freely. Due to this, all fixtures (e.g. kitchen islands and cabinetry) must be fitted before the installation of the parquet.
- Glueable split-level boards may only be fixed to the other surface of the floor. If an uneven skirting board is fixed between two rooms on both floor surfaces, it locks the floors together and prevents the normal expansion and shrinkage of the parquet floor.
- Skirting boards and thresholds must always be fixed in a way that does not prevent the parquet from expanding and shrinking normally. Do not fix the floorboards too tightly against the floor or a threshold through the parquet. Skirting boards, rails, thresholds etc. should not be screwed through the parquet so that they lock the parquet. When you are installing the parquet under door frames, you must also ensure that it does not prevent the parquet from natural expansion and shrinkage.
- For sliding-door cabinets, the allowance for moving must be made under the cabinets’ runner (10 mm) and the runner must be fixed to the parquet with short screws (12 mm) on the cabinet side.
- Install each room as a separate area. Cut the floor at each doorway with an expansion joint and install thresholds or threshold skirting boards at the doorways. The floor should be installed in a square or rectangular shape (e.g. an L-shaped room is installed as two separate floor areas). If the parquet is installed as a floating floor, gluing the parquet to the subfloor at doorways, in front of the fireplace or elsewhere is strictly prohibited. In a situation where an unconventionally shaped room is combined into one flooring area, we recommend the use of traditional glued tongue and groove products and gluing the floor to the underlay.
- Do not leave any pointed objects or brackets that prevent movement in the floor. For example, the expansion joint may not be filled with cables.
Subfloor and moisture barrier
The subfloor must be even – the allowable deviation is ±2 mm per two (2) metres. The levelness is checked by placing a floorboard tongue against the subfloor and measuring the gap remaining between the subfloor and the floorboard. Differences that exceed the allowable limit must be leveled out by sanding or applying appropriate filler material. The subfloor must be immovable, strong, solid, straight, dry and clean. Note that even small loose debris can cause unevenness that can wear the flooring. All fitted carpeting and other similar coatings must be removed. The underlay material must be as inelastic as possible. Suitable subfloors include: plywood or chipboard flooring, concrete surfaces, flagged and marble floors, linoleum and PVC. Note that an underlay material with a moisture barrier or a similar moisture barrier must always be installed on a concrete subfloor (e.g. 0.2 mm thick PE plastic, seams overlapped approx. 20 cm or taped).
The humidity of the sub-floor must be measured once more before installation. We recommend having the humidity of the concrete measured by a professional. Ensure that the sub-floor is dry along the whole installation area (also under any stored construction materials). Precise subfloor humidity measurements can be obtained by using the appropriate moisture meters. If the relative humidity of the subfloor is higher than 80% (max. weight percentage 3.0), DO NOT begin installing the flooring!
Preparations
Store parquet in unopened packages (the room must be dry, relative humidity of air 35–60% and temperature +18–24°C). For 2 to 3 days before installation, the flooring material must be kept in conditions (air humidity and temperature) that are similar to those in the room where the flooring will be installed. The packages should be stacked on a flat surface in a way that allows air circulation between them and they must be kept away from a direct source of heat (such as radiators or strong sunlight). Do not open the packages until you begin the installation. Only open as many as you need on the same day. Ensure that the underlay material is level and free of moisture before starting. We recommend measuring the moisture of concrete surfaces.
Ensure that the underlay material (moisture barrier and impact sound insulation material) and the tools required for the installation are ready. Always check the suitability of the moisture barrier and sound insulation material for the Timberwise parquet with your dealer.
Suitable impact sound insulation material alternatives include for example the following: The underlay must not be too thick (≤ 2.0 mm) or made of an excessively flexible material. We recommend an underlay with a compressive strength of at least 60 kPa. For the best result, use Timberwise underlay with a thickness of 1.1 mm and a compressive strength of 200 kPa.
Required tools: metric measuring tape/ruler, marker pen, try square, fitting wedges for expansion joints, circular or crosscut saw, clamping device, wooden knocking block, chisel, hammer, knife and wood glue (PVAC glue).
First calculate the number of floorboards you need. Use a metric measuring tape/ruler to measure the total width of the room; divide it by the width of a floorboard, and check how many complete rows of floorboards will be used for the room. Narrow the first row of floorboards, if the width of the last row of floorboards is going to be less than 50 mm. NOTE! Remember the expansion joints.
In order to get a floor that meets the qualities of the grade, alternate the floorboards from different packages during installation. Prior to installation, inspect the floorboards in sufficient lighting or daylight for potential visible defects. If there is a defect or you are unsure about how to proceed, contact your dealer. The manufacturer is not responsible for cases where floorboards have been installed without visual quality inspection.
Underfloor heating
The Timberwise flooring can safely be installed on an underfloor heating system. The underfloor heating must be evenly distributed over the whole floor area. Before installing the flooring, the subfloor must be allowed to dry for approximately 2 weeks.
All types of wood can react to excessively dry indoor air. If the relative humidity of the indoor air drops below the recommended 35 – 60% Rh (Relative humidity), the floor may crack. So remember to monitor the indoor air humidity, especially during dry seasons, such as winter, and if necessary, increase the humidity, for example with a humidifier. Softwoods (e.g. pine, larch and Douglas fir) as a wood material react most sensitively to dry indoor air, and hairline cracks or cracks can appear in it more quickly. The optimal indoor humidity for wood, 35 – 60% Rh (Relative humidity), is also the most optimal indoor humidity for humans.
Timberwise flooring can be installed over an underfloor heating system. Douglas fir/Pine/Larch is a softwood species. Softwoods also react more sensitively to fluctuations in humidity and dryness than hardwoods, structurally. Underfloor heating can probably cause hairline cracks or cracks in the surface of a softwood floor. With this in mind, softwood floors can also be installed with underfloor heating.
Please follow the instructions below:
- Raise the temperature daily by approximately 5°C per day, until the heating efficiency is about 50% of the maximum. Do this in the summertime as well.
- After this, raise the underfloor heating to the maximum temperature for a period of 3 days.
- Lower the heating power to allow the surface temperature of the underfloor to fall to 18°C. Ensure good ventilation during heating and cooling.
- Install the flooring according to the instructions.
- Raise the temperature gradually over 5 days, but ensure that the temperature of the wood floor surface never exceeds +25°C. At this stage, never cover the flooring, not even partially. Relative humidity must at all times be 35–60%. The recommended room temperature is 18–24°C. Under other conditions, the flooring may expand or shrink more than normal. The manufacturer, seller, or installer cannot be held responsible for these kinds of changes.
The following matters must be taken into consideration when installing the flooring on top of underfloor heating:
- The floor’s surface temperature must not rise above +27°C. Note that regular loose carpets raise the floor’s surface temperature by approx. +2°C!
- Floor temperature must not fluctuate regularly by more than 2°C during one day.
- A moisture barrier (e.g. 0.2 mm-thick PE plastic, seams overlapped approx. 200 mm or taped) must ALWAYS be installed together with underfloor heating, regardless of the subfloor material.
- Use an expansion joint to separate floor areas which do not have underfloor heating.
- We recommend installing underfloor heating cables or ducts at no less than a 30 mm distance from the underlay material of the Timberwise parquet.
- in wooden floors, an air gap
- in concrete floors, a filler layer.
- If the underfloor heating cables or ducts are installed at a distance of less than 30 mm from the parquet underlay material, the surface temperature of the flooring must not exceed 25°C.
- Cork grain underlays are not recommended.
Underfloor cooling
Timberwise flooring can be installed over an underfloor cooling system. The best result is achieved by fully glueing the parquet to the subfloor. If this is not possible, all joints must be glued, regardless of the joint type. A floating floor transfers cooling less efficiently and may create air gaps that increase the risk of condensation. The system must include effective dew point control, and the floor surface temperature must never fall below the dew point. Relative humidity must be maintained at 35–60%, and temperature changes must be gradual.
>Installation of traditional glue groove system product
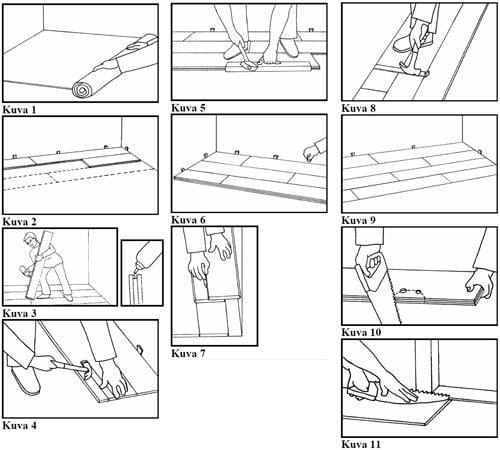
Begin by opening 3–4 packages at the same time and mix boards from the different packages so that you can arrange them in the desired order during installation. This helps to create a harmonious floor with the most natural possible appearance. Every board is unique. Place the grooves of the first floorboards against the walls and glue the floorboards of the first row to each other from the end groove and tongue mechanisms only. Leave expansion joints of approx. 10mm longitudinally from the wall.
If the wall is straight, you can place wedges between the wall and row of floorboards, once you have installed 3 rows of floorboards (Figure 2). If the wall is crooked (e.g. old houses), work the shape of the first row of floorboards, so that the installation is aligned as desired. Apply a sufficient amount of PVAC glue to the edge of the groove that is below the surface (Figure 3) and press the floorboards together. All side and end connections must be pressed tightly together. Immediately wipe the glue squeezed to the surface off using a wet cloth.
Tighten the last floorboard of the row (end connection) using a pull bar, when the glue is still elastic (Figure 4). Always start a new row of boards using the sawed off piece of the previous row. This allows you to minimize scrap waste during installation. Install the floorboards so that the connection seams of adjacent floorboards are at least 50cm apart. Using a tapping block, tap the floorboards into place with solid taps on the tongue side of the board starting from the free end of the floorboard and proceeding toward the end connection of the floorboard. This prevents gaps at the end connections of the floorboards (Figure 5). Be careful to not to damage the surface of the floorboard when using the tapping block.
Allow the glue of the three first rows to dry for approx. 2 hours, in order to create an even start for the following rows (Figure 6). After this, install the rest of the floorboards. Saw the final row of floorboards to the required width (Figure 7). Keep in mind that the distance from the wall must be approx. 10mm. Use the pull bar to tighten the floorboards into place (Figure 8). Allow the glue to dry for 12 hours (Figure 9) prior to removing the wedges (no later than 24 hours after installation) and then install the skirting boards.
Ducts
If ducts have been installed in front of the wall, a hole must be drilled into the floorboard in question. The hole should be 20mm larger in diameter than the duct, so that the floor has sufficient room for movement. First mark the point where the duct is to go through the floorboard. Then drill appropriate holes for the ducts and saw the pieces off (Figure 10). Reattach the pieces when the floorboard is in place.
Door openings and doorframes
Saw the door frames shorter so that the parquet board to be installed can barely fit underneath it (Figure 11). Do not forget to leave an expansion joint.
Corridors
Avoid installing floorboards crossways in narrow corridors, if possible. When it is unavoidable, however, reduce the ‘tension’ of the floorboard by sawing a groove through bottom grid of the board in a 45 ° angle (no deeper than a 6mm cut). At least every third row of floorboards must be installed so that the boards have been extended.
Skirting boards
Install the skirting boards into place to cover the expansion joints. Skirting boards are attached to the wall only, not to the floor.
T-lists
The opening in which the T-list is to be fastened must be at least 20mm wide. Lists are always installed centrally in the opening and glued to the floor by the bottom surface of the ‘lips’ (with, e.g., Power Tac, Sikaflex, or another similar elastic adhesive). Place 10–12kg weights on top of the moulding. Observe the drying time provided by the adhesive manufacturer, and keep the weights on top of the list for the entire drying process. Do not walk on or near the list before the glue has dried in accordance with the instructions. The underlay must be very clean, and concrete floors must be treated with primer before mounting the T-list.
After the installation
Protecting the flooring
If construction work is going to be conducted in the room or other surfaces are going to be finalized after the installation, the flooring must first be cleaned by vacuum-cleaning the debris from installation and then protected by using a moisture-permeable material (e.g. cardboard). When using corrugated cardboard, the smooth surface must be placed against the parquet! When furnishing a room, cardboard is not always sufficient for protecting the parquet. When moving heavy pieces of furniture, the parquet must be protected, for example, with a smooth carpet. Before moving a piece of furniture, ensure that the material does not colour or stain the floor. If the parquet has been installed with underfloor heating and the floor has been protected with a piece of cardboard for example, the surface temperature of the floor must not exceed 18°C. Sticky tape used for attaching the cardboard etc. MUST NOT be attached to the wood floor, because it might damage the surface when removed. NOTE! Due to dark yellowing, the floor should not be covered for longer than max. of 1 week.
Ideal conditions for a parquet floor
In order to ensure that the newly installed parquet will remain in good condition, the relative humidity of the room must be kept between 35–60% (RH) and the temperature between +18–24°C. After installation, the temperature and relative humidity of the room must be measured with suitable and sufficiently accurate meters. During the heating period, humidity must be regulated by using e.g. a humidifier and in the summertime by ensuring adequate ventilation. If the relative humidity of the room falls below the acceptable limit, small cracks can appear in the floor due to the natural characteristics of wood. Also, if the air is extremely dry some floorboards may become concave (or convex, if the air is too humid). If the humidity falls below 30% (RH), it must be increased by using e.g. humidifiers. If conditions optimal for parquet cannot be maintained and humidity is either too high or too low, creaking or permanent deformation may appear. We recommend monitoring the temperature and relative humidity of the room by using a digital combination meter in all seasons.
Ultraviolet (UV) radiation of the sun changes and deepens the natural tone of the wood. Thus uneven exposure of the floor to light may leave marks on the floor. This is why we recommend changing the position of furniture and carpets regularly in order to ensure that the floor is evenly exposed to daylight. Also mechanical dents are possible, if for example an uneven base of a piece of furniture is on the same position on the parquet for an extended period of time.